Let’s Start with Some Background: What Is Tambour Embroidery?
You might already be familiar with embroidery, but tambour embroidery is a very hands-on and sometimes tedious technique. Be forewarned: it takes patience and practice! That said, the process can also be incredibly meditative.
I’ve spent the last couple of weeks learning this technique, and for anyone interested in trying it, here’s some information to help you get started.
What You’ll Need
- A frame: I’ve been using a custom rectangle frame, but you can also use an ordinary embroidery hoop. If you use a larger frame, you will need 2-inch C-clamps to secure it tightly.
- A stand or support: Depending on your frame, you’ll need a way to hold it in place. If you’re using a larger frame, two plastic sawhorses can be a cheap and reliable option. An embroidery hoop can be held with a suitable clamp or stand. It’s important to have a stable setup because tambour embroidery requires both hands.
- Fabric: Silk organza is an excellent choice for beginners because of its transparency and strength. Other fabrics can work, too, depending on the project but should be tested.
- A tambour hook: This specialized embroidery tool typically has a wooden handle with a small, replaceable hook that screws into the end.
- Thread: Many different types of thread can be used, so feel free to experiment as you gain experience. A good option is rayon embroidery thread.
- Snips or small scissors: You’ll need these to trim loose threads.
Preparing Your Supplies
Before you begin stitching, you’ll need to prepare your workspace and materials.
First, make sure your fabric is stretched tightly across your frame. The word tambour means “drum,” which is a helpful reminder of how taut your fabric should be.
Next, check the orientation of your hook. Align the hook with the screw on the handle so you can keep track of which direction it’s facing, even when the hook is underneath the fabric.
You may also want to place your thread in a small container or thread holder to prevent it from rolling around while you work.
Before attempting a full design, practice puncturing the fabric with your hook. You need to hold the hook vertically. Inserting the hook and withdrawing it without snagging or stretching the fabric by gently pressing away from the hook when you pull it back
Tracing Your Design
Once your fabric is secured, it’s time to transfer your design.
You can use a pencil to trace a pattern onto the fabric, but be careful: pencil marks may be difficult to remove, especially from delicate materials such as silk organza.
Another option is a heat-erasable pen commonly used for sewing. However, always test your marking tool on a scrap of fabric first. Some heat-sensitive marks can reappear in cold temperatures, and certain fabrics may not tolerate direct heat.
Choose a simple design to begin with. Straight lines, gentle curves, and small shapes are ideal for practicing your stitches before moving on to more complicated patterns.
Stitching
Now that everything is prepared, it’s time to stitch!
1.
Sit comfortably at your frame, with the fabric in front of you. Drape the thread over your pointer finger underneath the frame.
2.
Insert the hook through the fabric and catch the thread underneath. Pull the hook back through the fabric, bringing the thread with it until you have a thread tail on the top side.
Take this tail and loop it around the pinky finger of your upper hand. This helps keep the thread from slipping back through the fabric.
3.
Using your other hand underneath the frame, hold the working thread between your thumb and pointer finger. Keep the thread under consistent tension. It should be secure enough to control but loose enough to feed smoothly through the fabric.
4.
Insert the hook into the fabric just ahead of where the thread comes through. With your underneath hand, guide the thread around the hook, bringing it back toward the rear of the needle.
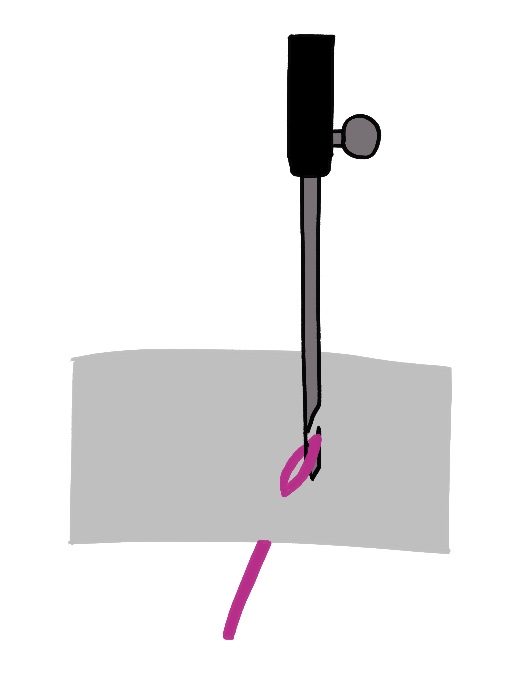
Lift the hook slightly while keeping it beneath the fabric until you feel the hook catch the thread. Rotate the hook and thread together then draw the hook back through the fabric, forming a small chain.
If the hook catches you may need to push the needle back down before drawing it up through the fabric. The diagram below starts with the small chain on the hook.
5.
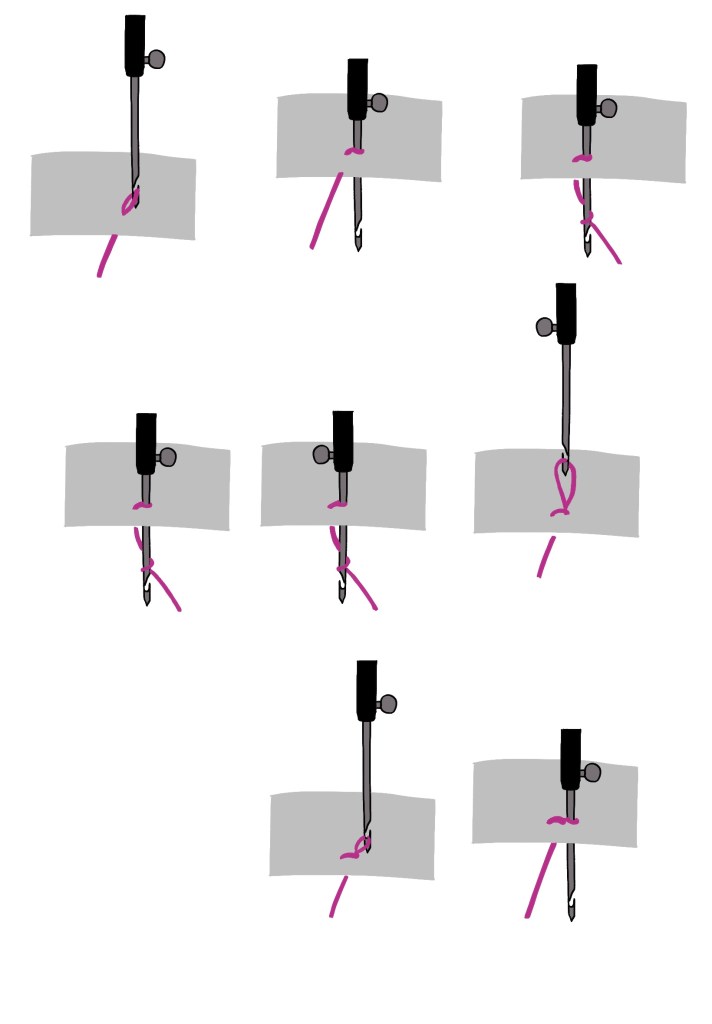
Go backwards 2 to 3 threads in the fabric and repeat the stitching process to make another chain. This is a locking stitch and acts as a knot. Release the thread wrapped around your pinky. Repeat the stitching motion, following the lines you traced onto the fabric.
Try to keep your stitches consistent in size and tension. Don’t worry if they aren’t perfect at first; this will come with practice. Take your time, especially around curves and corners. The diagram below shows the process.
6.
When you reach the end of your design, secure the final stitch by creating another locking stitch so the chain doesn’t unravel.
A Few Final Tips
Tambour embroidery has a learning curve, so don’t be discouraged if your first attempts are frustrating. Getting comfortable with the hook, coordinating both hands, and maintaining consistent thread tension takes time.
Start with a simple design, practice making even chain stitches, and remember to take breaks when you need them. Once the movements begin to feel natural, you may find that tambour embroidery becomes a relaxing creative practice.


Leave a Reply